Compression Settings Cheat Sheet (Per Instrument)
Ratio, attack, release and gain-reduction starting points for every common instrument, what each control does, and a simple method to dial in a compressor by ear.
- Attack decides how much of the transient gets through: slower attack = more punch, faster attack = more control.
- Release should let the signal recover before the next hit or phrase.
- Ratio 2:1–3:1 for gentle control, 4:1–6:1 for firm control, 8:1 and up for aggressive or peak limiting.
- Set threshold by gain reduction, typically 3–6 dB on vocals and drums and 1–3 dB on the mix bus.
- Match output level with make-up gain before judging, because louder always sounds "better".
Compression settings by instrument
Starting points, not rules. Thresholds depend on how loud your track is, so the table gives a gain-reduction target instead: lower the threshold until the meter shows that much reduction on the loudest parts.
| Element | Ratio | Attack | Release | Gain reduction |
|---|---|---|---|---|
| Kick | 4:1–8:1 | 5–10 ms | 50–100 ms | 3–6 dB |
| Snare | 4:1–6:1 | 5–15 ms | 100–200 ms | 3–6 dB |
| Bass | 4:1–6:1 | 30–50 ms | 150–300 ms | 3–6 dB |
| Hi-hat | 2:1–3:1 (or none) | 10–20 ms | 50–100 ms | 1–2 dB |
| Overheads / cymbals | 2:1 | 20–30 ms | ~150 ms | 1–3 dB |
| Lead vocal | 3:1–4:1 | 10–30 ms | 100–200 ms | 3–6 dB |
| Background vocals | 4:1–6:1 | 5–15 ms | ~100 ms | 4–8 dB |
| Adlibs | ~6:1 | ~5 ms | ~80 ms | 4–8 dB |
| Clean guitar | 3:1–4:1 | 10–20 ms | 100–200 ms | 2–4 dB |
| Distorted guitar | Little or none | – | – | 0–2 dB |
| Piano | 2:1–3:1 | 20–50 ms | ~200 ms | 2–4 dB |
| Synth lead | 4:1–8:1 | 1–10 ms | 50–150 ms | 3–6 dB |
| Pads | 2:1–3:1 | 50–100 ms | 500 ms+ | 1–3 dB |
| Strings | ~2:1 | 30–50 ms | ~300 ms | 1–3 dB |
| Mix bus | ~2:1 | ~30 ms | Auto / medium | 1–3 dB |
Distorted guitars are already compressed by the distortion itself, which is why they need little or no extra compression.
What each control does
- Threshold: the level where compression starts. Lower threshold = more of the signal gets compressed.
- Ratio: how hard it compresses above the threshold. At 4:1, a signal 4 dB over the threshold comes out 1 dB over.
- Attack: how quickly the compressor reacts once the signal crosses the threshold.
- Release: how quickly it stops compressing after the signal falls back.
- Knee: a soft knee eases into compression gradually and sounds smoother; a hard knee is more obvious.
- Make-up gain: brings the level back up after compression so you can compare fairly.
See every element on one map
MixMap plots all of this for 63 elements across Pop, Hip-Hop, R&B, Electronic and Indie: frequency, pan, width, level, compression, reverb and delay. Click an element to get its settings.
How to set attack and release by ear
- Start with a high ratio and a low threshold so the effect is exaggerated and easy to hear.
- Turn the attack from fastest to slower until the transient (the "hit" or the consonant) comes back to life. Stop there.
- Adjust release until the compressor recovers in time with the groove, with no pumping (unless you want pumping) and no choking.
- Now set the ratio and threshold back to where you get the gain reduction you need.
- Match the output level with make-up gain and bypass on and off to check it actually sounds better.
Compressor types and when to use them
- FET (1176-style): very fast and aggressive. Great for catching peaks on vocals, drums and bass.
- Optical (LA-2A-style): smooth, program-dependent and slower. Natural levelling for vocals, bass and piano.
- VCA (SSL-style): clean and precise. The classic drum-bus and mix-bus "glue".
- Variable-mu (tube): gentle and warm. Often used on the mix bus or in mastering.
Two compressors in series, each doing a little, often sound more natural than one working hard, for example a FET to catch peaks followed by an optical for overall level on a vocal.
Parallel compression
Send drums (or a vocal) to a separate bus, compress that copy hard with fast attack and a high ratio, and blend it in quietly under the original. You get density and sustain while the original keeps its natural punch. This is often called "New York" compression and is a staple on drum buses.
Common compression mistakes
- Attack too fast on drums. It kills the punch you were trying to add.
- Comparing at different volumes. Always level-match before judging.
- Compressing everything by default. If a part already sits well, leave it.
- Too much gain reduction on the mix bus. Aim for glue (1–3 dB), not squashing.
MixMap — The Complete Mix Reference
Stop searching for the same settings every session. One interactive reference with starting points for every element in 5 genres, with pan values for Logic, Ableton, FL Studio and Pro Tools.
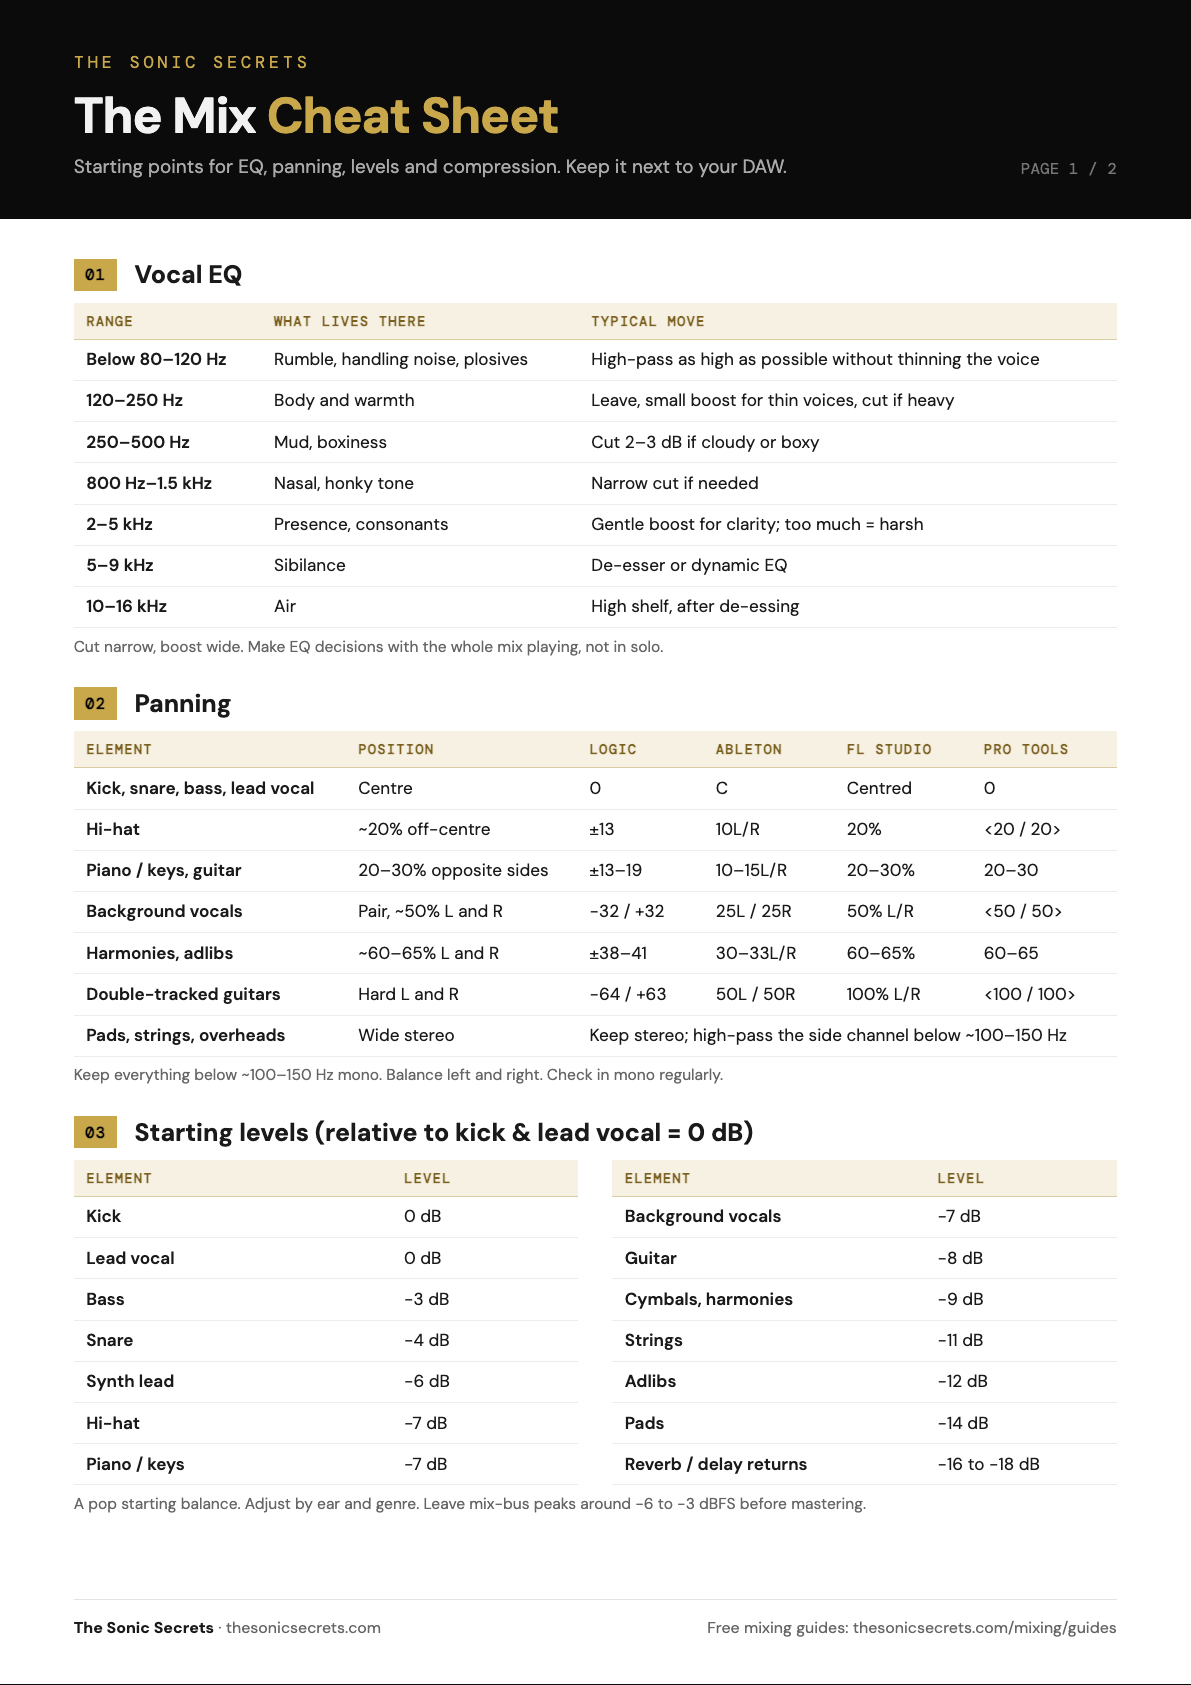
Get the 2-page Mix Cheat Sheet
Vocal EQ, panning with DAW values, starting levels, compression and reverb settings on two printable pages.
Your cheat sheet is ready. A copy is on its way to your inbox too.
DOWNLOAD PDF →